Wednesday, October 12, 2011

Stephanie's favorite pot roast


If you love pot roast, (and who doesn't) I really need you to try this recipe. Even if you have had horrible pot roast experiences (I'm thinking dry, shoe leather experiences.) This recipe is not that kind of girl. I promise it is fool proof and easy! Cook up a huge batch, have your friends over and drool over the aroma.  They will think you worked all day on it! You are so sneaky.

Lazy dog days of Fall

This roast is seared quickly to get a nice brown crust on the outside.  Then it is slow cooked in red wine, herbs, tomato sauce and hearty vegetables. The taste is complex and so satisfying. It's perfect for colder weather. Make extra because the leftovers just get better as the days go by!

Steph's favorite pot roast
3 lb boneless beef chuck roast
4 branches fresh rosemary
5 sprigs fresh thyme
3 garlic cloves, minced
1 cup red wine (recommended: Pinot Noir)
1 cup reduced sodium beef or chicken broth
4-5 carrots
2 medium onions
4 celery stalks
2 bay leaves
2 tablespoons extra virgin olive oil
1 (28 oz.) can whole tomatoes in puree 
Salt and pepper

Note: pick a red wine you would enjoy drinking because the flavor intensifies during cooking

Serves 6-8

1.) Chop your veggies so they will be ready to go. Peel the onions and chop them into quarters. Chop the celery and carrots into nice, big pieces. They will be slow braised for a long time, so you want them big so they don't fall apart on you.  Mince your garlic. Take your rosemary and thyme and tie together in a bundle with kitchen twine or any heatproof rope.  This makes it very easy to remove the herb bundle stems after the dish has cooked. Set all of this aside.

Rosemary and thyme bundle of joy

2.) Preheat the oven to 300 degrees. Take your pot roast and season it well with salt and pepper. Take a large dutch oven and place it over medium-high heat until it is very hot, but not smoking.
3.) Put 1 tablespoon of olive oil in the hot pan and sear the beef on each side until a nice brown crust has formed, about 5 minutes per side. Remove from the pan and set aside once all sides have browned. Turn the heat down to medium and let the pan cool slightly.
4.) Using the same pan, add 1 tablespoon of olive oil, the onion, celery, carrots and garlic. Season with salt and pepper. Cook for 2-3 minutes. Don't let the garlic burn, it's bitter when burned. 
5.) Take your cup of red wine and pour it over the vegetables. Using a wooden spoon, scrape all of the tasty brown bits off the bottom of the pan. Add the tomatoes, herb bundle, bay leaves and cup of stock. Nestle the roast in the middle of all of this yummy goodness. You want it covered about 3/4 of the way with liquid. 
6.) "Set it and forget it..." No, really. Just put it in the oven and cook it, covered, for about 3 1/2 to 4 hours until it is falling apart and perfect. 
7.) Remove the herb bundle and bay leaves and discard. 


Notes: I start checking on mine around 3 hours. Do not stress if yours is not done in 4 hours!  Just leave it in there until it's soft. Every roast has different amount of collagen that has to break down before it will be tender. Patience and love is the key with this dish. 

Serve warm with the sauce spooned over it. Recommended side: mashed sweet potatoes or anything creamy. 


Sunday, September 25, 2011

Roasted sweet potato and coconut milk soup

Hi friends!

I can't believe it has been almost a year since I started my blog!  Things have been so busy lately, and there has not been much time left for creativity. I was inspired by a good friend and decided to get my nose out of the books and get myself in the kitchen.

Appolonia says "hot weather is so last season."

Have I mentioned how much I love the Fall??  Well, if you didn't know, I am pretty much obsessed with it.  Dan and I scheduled our wedding in October because the weather is typically so gorgeous in October. When the day came, it was 51 degrees and raining. Typical. I love all things Fall: boots, pumpkins, Halloween, even the smell in the air makes me incredibly happy. There is nothing better than a big bowl of comforting soup after a long Fall day. That is the inspiration for this recipe.

This soup starts out pretty standard: the classic trio of celery, carrots, and onions cooked down slowly. The addition of the roasted sweet potato and the coconut milk make it thick, rich and incredibly creamy. It tastes like you are eating something very naughty, which is always a bonus for me!

Don't skip out on the flavorful spices. The coriander adds a brightness and is slightly lemony. The cumin balances the soup with a really nice smokiness. Because the soup is so creamy, I like to serve this with something crispy on top. I went for chopped almonds.  You could also use pecans, croutons or some crispy shallots.  

Roasted sweet potato and coconut milk soup
2 carrots, peeled and small dice
2 stalks of celery, small dice
1 medium yellow onion, small dice
4 medium sweet potatoes (about 2 1/2 lbs), chopped into 1 inch cubes
2 cloves garlic, minced
1 teaspoon fresh thyme leaves
2 teaspoon ground coriander
1 teaspoon ground cumin
1 (13.5 oz) can full fat coconut milk
3/4 to 1 quart chicken stock (depending on how thick you like your soup)
Extra virgin olive oil (around 6 tablespoons total)
Salt, freshly ground black pepper
Garnish options: chopped roasted almonds, pecans or croutons
Special equipment: blender or food processor

Makes about 2 quarts in total

Preheat oven to 425 degrees.

Start by roasting your sweet potatoes. You don't have to peel them, just make sure they are clean. Chop them into 1 inch cubes and place on a baking sheet. Drizzle with enough olive oil to coat and season with salt and pepper.  Roast in the oven for about 35-40 minutes, flipping them once to ensure even caramelization. They should be easily pierced with a knife. Once roasted, remove from the oven and set them aside.


Preheat a dutch oven over medium-low heat with 4 tablespoons extra virgin olive oil. Place the chopped onion, celery, carrots and garlic in the pan and season with salt and pepper. I used 1 1/2 teaspoon salt and 3/4 teaspoon black pepper to get it going.  Add the coriander, cumin, and thyme to the vegetables. Sauté until the onions become translucent and the vegetables have begun to soften, around 8-10 minutes.

Once the vegetables have sweated down, add the roasted sweet potato, coconut milk and 1/2 quart chicken stock. Let the soup cook on simmer for around 20 minutes.


Working in  2 batches, puree the soup in a blender until it is smooth.  The soup will be very thick. Through the hole in the lid of the blender, add more chicken stock until the soup is the consistency that you prefer. I like mine thick, but if you prefer it thinner, just add more stock. I ended up using the whole quart between the 2 batches.  Taste for seasoning.  I added a little bit more salt to my batch.


Top with chopped almonds or pecans for crunch.

I hope you all are loving this season as much as I am!

Monday, August 22, 2011

Flourless pecan and banana "ice cream" sandwiches

Really? Who doesn't love an ice cream sandwich? I ate one of these and was instantly transported back to 1989. Memories of side pony tails and jorts came creeping into my mind. Then, thankfully, went away.

Anyone that knows ANYTHING knows that peanut butter and banana is a pair made in heaven. Just ask Elvis. I discovered this combo when I first moved to Atlanta and quickly became obsessed with it.  I would eat a peanut butter and banana sandwich for breakfast every day. Religiously. Obsessively. Then I made the lateral move over to peanut butter oatmeal.  Ahh...memories. The dogs have witnessed many mornings with me and my sacred breakfast.


When I started Crossfit last year, my good friend Mike K. introduced me to the joys of pecan butter. My friend Oum Kulsoom makes homemade nut butters (http://kbanutbutters.com/nut-butters). I fell in love with the pecan cinnamon. Pecans have since become my favorite nut. They are sweeter and creamier than peanuts, not to mention all the healthy fat benefits.


This recipe is so easy and is perfect for a healthy treat. No ice cream maker required! No tempering, no cooking and absolutely no complications. The only kitchen product you will need is a food processor or a good blender. The "ice cream" is made simply of frozen bananas, vanilla, and heavy cream. It has the consistency of a good soft serve ice cream and pairs so well with the soft cookie. It relies only on the natural sweetness from the banana, so if you prefer a sweeter ice cream, use the suggestions listed below.

Flourless pecan and banana "ice cream" sandwiches
For the "ice cream":
3 medium, ripe bananas
1 teaspoon pure vanilla extract
1/4 cup heavy whipping cream
*Optional (for more sweetness): 2 tablespoons honey, 6 packs truvia, or 1/4 cup Splenda

For the cookies:
1/2 cup pecan butter (you could also use peanut or almond butter)
Sweetener (12 packs Truvia is what I used. You can also use 1/2 cup sugar or 1/2 cup Splenda)
1 large egg
1 teaspoon pure vanilla extract 
Kosher salt for sprinkling

Makes about 12 small cookies and 2 cups ice cream

Start the ice cream:
1.) Chop your bananas into 1 inch discs. Place in a container, cover and freeze completely. 


Make the cookies:
1.) Preheat the oven to 350 degrees
2.) Place 1/2 cup nut butter, 1 teaspoon vanilla extract, 12 packs Truvia, and 1 egg into a large bowl. Whisk to combine completely. The batter will be very wet.


3.) Scoop out the batter into round tablespoons and place on cookie sheet. Try to make them all the same size. It helps if you use a tablespoon measure. Sprinkle the cookies with a little bit of kosher salt. The slight hint of saltiness on the outside is a nice balance to the sweet cookie.


4.) Bake in center of the oven for 8 minutes. Let cool on cookie sheet for about 5 minutes, then transfer to cooling rack to cool completely.


Finish the ice cream:
1.) Once your bananas have frozen, remove from the freezer and microwave on high for one minute to soften them just a little bit. 
2.) Place in a food processor with one teaspoon of vanilla extract and 1/4 cup of heavy cream. Blend to a soft serve consistency. You will have to stop the processor and stir it every now and then to move the banana around.  Eyeball the consistency--if you want it with chunks of banana, blend it less. If you want it creamier, blend more and add a little more heavy cream. This part is all up to you! 


Assemble the cookies:
1.) Take a hefty tablespoon of banana ice cream and place it between two cookies
2.) Bite and feel like a happy kid again
3.) Send me an email and tell me how much you love me for showing you this recipe


Sunday, August 14, 2011

Roasted broccoli with garlic olive oil


Hi friends!

This recipe is delicious+easy+healthy=winning like a boss.

I have been having a bit of vegetable "writer's block" lately. I go to the farmer's market religiously every week and buy the same vegetables.  I always end up sandbagging and prep them the same way. With broccoli, I would boil it and throw it in my egg scrambles for the week. BORING.

About a week ago I decided to switch it up and roast it rather than boiling it. I never thought broccoli could be so yummy that I couldn't stop eating it!  Rather than boiling out all the flavor, the broccoli gets intensified and crispy around the edges while still maintaining a nice texture. It gets roasted in a (simple to make) garlic olive oil and then tossed with a little bit of fresh basil and almonds after cooking. Delicious.

Make the entire batch of garlic olive oil. You won't use it all for this recipe, but it stores forever in the fridge. Use it for extra flavor in salad dressings and in your cooking.

Note: don't use frozen broccoli here because the extra water won't allow for crisping in the oven


Roasted broccoli with garlic olive oil
For the garlic olive oil:
1/2 cup extra virgin olive oil
2 cloves fresh garlic, smashed

For the broccoli:
1 head fresh (not frozen) broccoli, cut into florets
Salt and pepper to taste
1/4 cup fresh basil, chopped into thin strips (julienned)
1/4 cup almonds (use roasted, not raw)

Serves 2-4

Preheat oven to 425 degrees

Make the olive oil:
1.) Pour 1/2 cup extra virgin olive oil into a medium saucepan over medium low heat.  
2.) Smash 2 cloves of garlic and add to the olive oil. Cook over low heat until the olive oil is fragrant and the garlic is lightly browned, about 5 minutes. Do not allow garlic to burn. Burnt garlic is really bitter.
3.) Once garlic is lightly browned, remove and discard.  Set the olive oil aside.

Make the broccoli:
1.) Chop broccoli into florets and place on baking sheet.
2.) Drizzle each floret with a little bit of garlic olive oil. I used about 3 tablespoons to cover all of the florets. 
3.) Sprinkle with salt and pepper to taste.  Toss the broccoli around to make sure each side is seasoned and coated with olive oil.
4.)  Roast in the oven for 20 minutes.  Toss the broccoli around occasionally, around every 5 minutes, to ensure that all sides brown evenly.  The broccoli is done when the florets are crispy and lightly browned.
5.) Chop your basil and your almonds and toss in with the cooked broccoli along with 1 more tablespoon of the garlic olive oil.
6.) Place in serving bowl--serve hot

This goes great with a big, thick cut steak and a roasted sweet potato. Go get your fiber intake for the day! 


Thursday, July 14, 2011

Maple bacon coconut milk ice cream

Bacon. Words can not describe how I love thee...


You all know how strongly I feel about this by now I hope. Well let's push the pig to the limit.

Maple bacon coconut milk ice cream!!  *squeal of joy!*

Three things I love: the sweet, creamy deliciousness of coconut milk combined with the salty crunch of bacon and the richness of the maple syrup. Divine. You. MUST. MAKE. 

Did I mention it is sweetened with Truvia, so no guilt!

I have an ice cream maker, and it makes it easier to make if you do too (obviously.) But, don't let that stop you. You can still make homemade ice cream without all the fancy equipment. Let's discuss...


Maple bacon coconut milk ice cream
2 13.5 oz cans full fat coconut milk
1/2 cup grade B maple syrup
12 packs of truvia, divided
6 slices thick cut bacon, cooked 
5 egg yolks
1/2 teaspoon cinnamon

Makes about one quart

Start by reducing your maple syrup. Put it over medium-low flame and let it cook down until reduced by about half. Just estimate. Once reduced, remove from heat and set aside.

Take your 5 eggs and separate the yolk from the white. Put the yolks into a medium size bowl and whisk with 4 packs of Truvia. Set aside.  (I saved my egg whites for an omelette. No wasting!) 

Take the 2 cans of coconut milk plus your remaining 8 packs of Truvia and simmer over medium-low heat in a saucepan, until hot and just bubbling around the edges. 

Now, the important parts!  You need to temper your eggs. This just means that you are adding a small amount of hot liquid to the eggs in order to warm them up without scrambling them. If you were to just dump them into the hot coconut milk, the heat would immediately react with the eggs and you would have breakfast, not ice cream! Take 1/2 cup of your hot coconut milk mixture (or about a ladle full) and slowly add it to the eggs, whisking the entire time until well incorporated. 

Lovingly stand over your cream anglaise (ice cream base) and stir continuously with a wooden spoon. This is not the time to go check your email. Be patient, your time will be rewarded. Stir until the mixture thickens up. You can tell it is ready when it looks visibly thicker to the eye and the mixture coats the back of your wooden spoon. Here is another way to tell:

When your run your finger down the spoon, it creates a solid line with no running. Cool, huh?

Remove the cream anglaise from the heat and whisk in your maple syrup. Pour through a fine mesh sieve into a medium bowl. This catches any rogue egg that may have misbehaved and scrambled in the cooking process. Let chill in the fridge for a few hours, atleast 4.

Now we freeze! 

Pour the custard into your ice cream maker and freeze for about 20 minutes, until the ice cream looks like soft serve.  While churning, chop your bacon into bite sized chunks, big enough to be seen in the ice cream. In the last couple of minutes of churning, add 1/2 teaspoon cinnamon and the bacon to the ice cream until just combined. 

Soft serve texture


Place in a container and freeze until firm. 

If you don't have an ice cream maker: follow same directions except after cooling in fridge, place in large bowl and whip with a hand mixer for about 2 minutes. Place in freezer and chill for 2 hours.  After 2 hours has elapsed, whip again. Repeat one more time.  On last whip, add bacon and cinnamon. Done! 


This is truly addictive. 


Sunday, June 19, 2011

Eating in season: tomato summer salad

Two things that let me know when it is summer time:
1.) When I bite into a fresh peach and the juices run down my arm
2.) Tomatoes are ripe and sweet
Well, maybe 3...I would also add:
3.) My dogs sound like a freight train with their excessive panting!


I was killing time at Bacchanalia the other day and I saw these baby organic heirloom tomatoes.  They also had fresh summer squash. I didn't know exactly what I was going to do with them, but I knew I had to have them. NOW! 


Once you have tasted something when it is at the peak of freshness, you will never look at food the same way again. What I would suggest is to learn what is in season where you live. Look at the produce schedules and get to know what to look for.  Here is a good one: http://www.goshenmarket.org/produce_schedule.htm
I never want to eat tomatoes out of season again after having this salad. I have been ruined! :)

Tomato summer salad
1 pint ripe cherry, grape or baby heirloom tomatoes
1/2 english cucumber, chopped into large chunks
3 small squash-any variety you like 
2 tablespoons chopped red onion
1 clove minced garlic
2 tablespoons jarred capers, drained
1 diced avocado
Juice of 1/2 of a lemon
1/2 cup fresh basil leaves, loosely packed 
Red wine vinegar
1/4 cup extra virgin olive oil
Salt and pepper

Serves 4

Start with your squash. Preheat a pan over medium heat with 2 tablespoons EVOO.  Chop off the ends and cut then in half lengthwise. Chop into small 1/2 moons, about 1/2 of an inch thick. Add the squash to the pan, season with salt and pepper and cook until browned and caramelized on both sides. Once cooked, take off the heat to cool a little bit.

Take your ripe avocado, remove the pit and discard. Chop into large chunks--you want to be able to see it in the salad. Plus, if you make it too small, it will turn to avocado mush!  Put it in a pretty bowl and squeeze the juice from a half of a lemon over the avocado. Toss it in the lemon juice so all of the cut sides get covered with lemon juice. This adds flavor and also prevents the avocado from oxidizing and turning brown.

Grab your tomatoes. Chop the larger tomatoes in half, or if they are small, leave them whole. Put them in the bowl. 

Take your cucumber and cut it in half, reserve the other half for another recipe.  I buy the English cucumbers because they are sweeter and have fewer seeds, but you can use any kind you like. Chop your cucumber lengthwise, and then into half moons. Try to make them around the same size as the squash. Add the cucumber to the bowl with the tomatoes and avocado.

Prep the rest of the ingredients--mince the garlic, chop the onion, basil, drain the capers. Add all of these ingredients, plus the cooled squash to the salad. Don't skip out on the capers--they lend a tangy brine flavor that really adds to the complexity. Plus whatever you don't use stores well in the fridge for a long time. 

Make the dressing:  this is VERY easy.  One part acid to two parts oil.  I used one tablespoon red wine vinegar with two tablespoons extra virgin olive oil.  Whisk together to combine and pour over the salad. Season the salad liberally with salt and pepper and toss to combine all ingredients.

Enjoy your summer! 


Tuesday, May 17, 2011

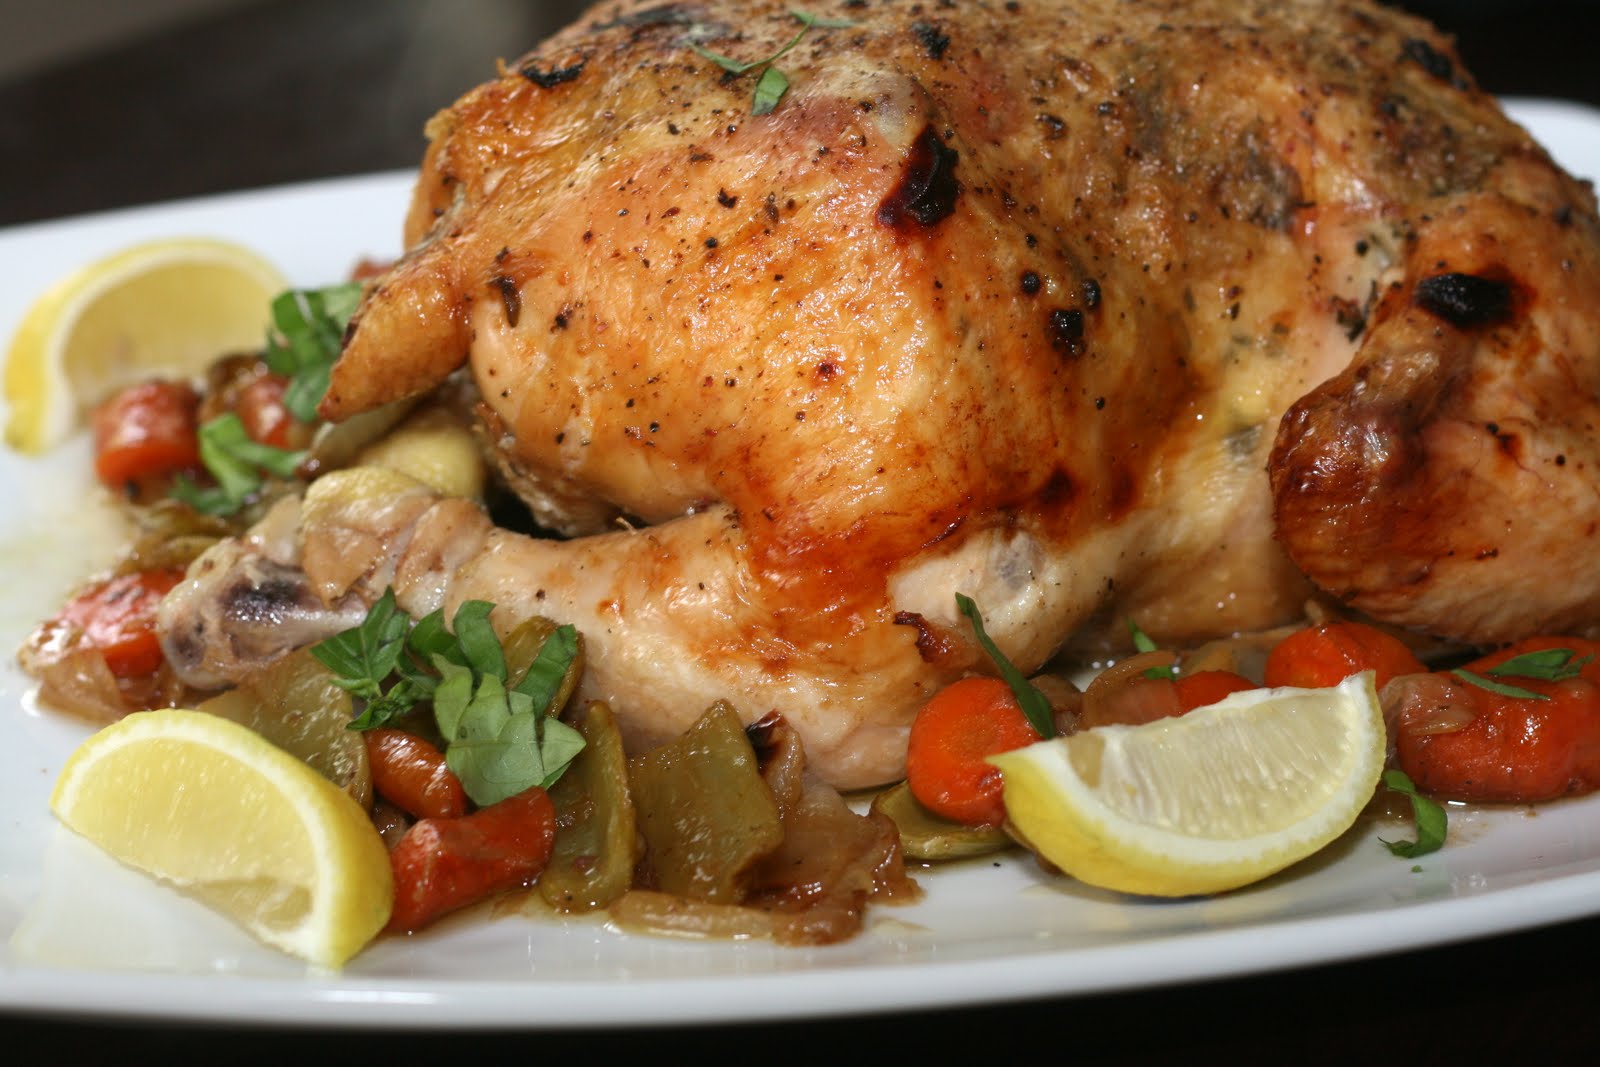
Roasted chicken and veggies with herb butter

Chicken. The word brings joy to my heart, disdain to my husband's. Well, maybe not exactly.


I tend to rely on chicken as my "go to" meal. Dan's reaction: "Chicken...again!?"  I think he is just jealous because every time he makes it, it turns out salmonella pink. ;)

There are a million plus chicken recipes, but sometimes you just crave a classic roasted bird, done perfectly with crispy skin and juicy meat. This recipe is just that, paired flavors that don't overwhelm, just compliment the chicken. This recipe has lots of fresh herbs, clarified butter, lemon and roasted veggies nestled underneath. The vegetables get super tender and soak up all the flavors of the herbs and chicken jus. I find myself just standing over this bird in the kitchen, eating chunks with my fingers. It's quite the sight to see. 

For this recipe to be done paleo, you need to clarify the butter. Basically, this just means melting the butter over a low heat and skimming off all of the milk fat. Clarified butter is also known as ghee. You can buy it, but why?  Doing it yourself is so easy, plus it will save you money! Not going paleo? Just use regular butter.

Spring for the fresh herbs for this recipe. Use whatever you need, then freeze the rest in a plastic bag. It will be ready to go when you are.

Roasted chicken and veggies with herb butter
1/2 stick butter-clarified (instructions to follow)
One tablespoon chopped fresh rosemary, plus 2 stalks for cavity
One tablespoon chopped fresh thyme, plus 3-4 stalks for cavity
One 5-6 lb chicken, gizzards removed
Two lemons
Three cloves garlic, chopped
Two medium sized onions,  rough chop
Three celery stalks, rough chop
Three carrots, rough chop
Salt and pepper
Kitchen string

Take your chicken out of the fridge and let it come to room temperature for about 20 minutes or so while you prep the ingredients. Preheat the oven to 425 degrees.

Start by clarifying your butter. Place it in a small saucepan over low heat and let the milk solids come to the top. Skim them off with a spoon. Pour into a small bowl and set aside.

Milk solids at the top, fat at the bottom

Chop your herbs-rosemary, thyme and two cloves of garlic. Add to the clarified butter and stir to combine ingredients. Place the butter in the freezer for a few minutes to harden while you prepare your chicken. Chop your lemon into 6 wedges.  Chop the carrots, onions, and celery into large chunks. Mince your other clove of garlic. Set aside.

Grab your bird and some paper towels.  Dry the chicken well to ensure the skin gets really crispy. Sit it up on it's little rear end in a large dutch oven and season the cavity of the chicken liberally with salt and pepper. Stuff the cavity with the rosemary and thyme stalks, the lemon wedges, and one of your chopped onions.


Now for the bondage:

Tie the little bird's legs together and tuck the wings under so all portions cook equally.


Let's get messy here. Grab your clarified butter out of the freezer, it should have solidified by now. Get your hands underneath the skin of the chicken so you are touching the actual flesh.  Make little pockets and stuff the clarified butter underneath the skin. Rub the butter into the bird like you are giving it a deep tissue massage. These butter pockets melt and baste the chicken while cooking, not to mention the flavor they give the vegetables.  No dry, tasteless bird here!


Once you have given the chicken a proper rubdown, season the outside well with salt and pepper. Place the vegetables and minced garlic clove around the chicken. Sprinkle the veggies with salt and pepper too. Remember, you have to season each layer to reach full flavor potential. 


Roast at 425 degrees for an hour and a half, or until the juices run clear when you cut between the leg and the thigh. I like to toss the veggies around about every 30 minutes to ensure equal browning. Let the chicken rest for 20 minutes before slicing. Don't forget to remove the string! :) Garnish with more fresh herbs and lemon slices.


Try to be a better person than me. Enjoy with utensils.